Installing kitchen sink plumbing involves connecting the drain assembly, P-trap, and water supply lines correctly to ensure proper drainage and prevent leaks. If you are replacing an old sink or upgrading your kitchen, you may be unsure about pipe alignment, sealing fittings, or whether you can handle the job yourself. That hesitation is normal. Incorrect installation can lead to water damage inside cabinets, slow drainage, unpleasant odors, or persistent leaks that become expensive repairs.
The good news is that most standard kitchen sink plumbing installations follow a clear, manageable process when done carefully. In this guide, you will learn the exact tools and materials required, a step-by-step breakdown of the installation process, common mistakes to avoid, and how to test for leaks properly. You will also understand when a simple DIY approach is sufficient and when calling a professional plumber is the safer option.
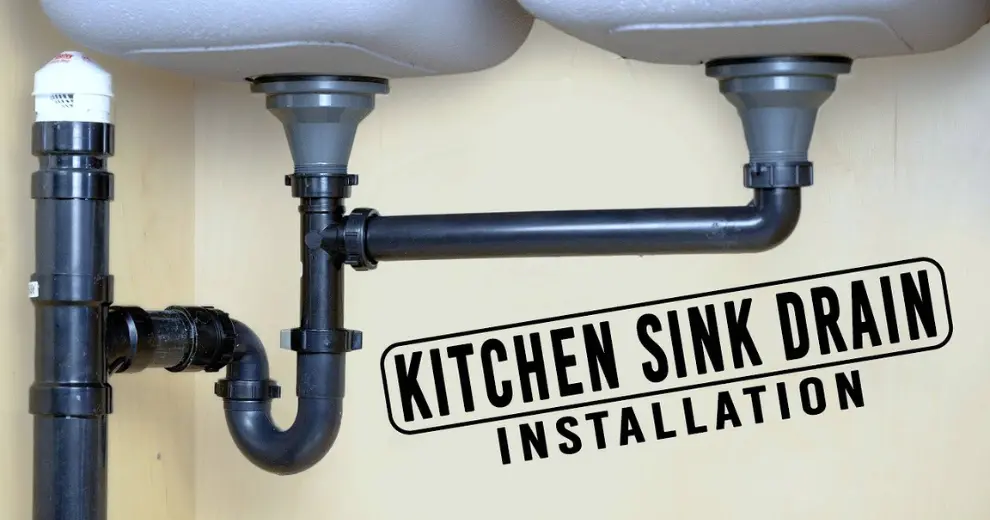
How to Install Kitchen Sink Plumbing Correctly
To install kitchen sink plumbing correctly, you must shut off the water supply, install the sink strainer and tailpiece, assemble the P-trap, connect the drain to the wall outlet, attach hot and cold water lines, and test thoroughly for leaks.
The entire process typically takes 1.5 to 3 hours for beginners, depending on sink type and whether parts are pre-aligned. If you are working with standard single-bowl sinks and existing drain lines are properly positioned, the task is manageable for most homeowners.
You will need basic plumbing tools and fittings such as a P-trap assembly, slip nuts, washers, plumber’s tape, and adjustable wrenches. Preparation and patience are more important than advanced plumbing knowledge.
Tools and Materials Checklist Before You Start
Before beginning, gather all tools and materials. Having everything within reach prevents mistakes and unnecessary disassembly.
You will need:
- Adjustable wrench
- Plumber’s tape (PTFE tape)
- Slip nuts and washers
- P-trap assembly
- Tailpiece and extension pipe
- Water supply lines
- Bucket and towel
The bucket is essential because small amounts of water may drain out when disconnecting old pipes. Towels help keep the workspace clean and prevent slipping.
Check that all washers are intact and flexible. Old or brittle washers are a common cause of leaks.
Step-by-Step Guide to Install Kitchen Sink Plumbing
Step 1 – Shut Off Water Supply and Prepare the Area
Turn off the shut-off valves located under the sink. If your sink does not have individual shut-off valves, you may need to turn off the main water supply.
Place a bucket under the drain pipes to catch any remaining water. Remove old plumbing carefully if replacing components. Clean the area so new fittings sit properly.
Safety tip: Always confirm water is fully off before disconnecting supply lines.
Step 2 – Install the Sink Strainer and Tailpiece
Apply plumber’s putty around the underside of the sink strainer. Insert it into the drain opening and press firmly to create a watertight seal.
Secure the strainer from underneath using the mounting hardware provided. Wipe away excess putty.
Attach the tailpiece to the bottom of the strainer. Hand-tighten first, then use a wrench gently if needed. Avoid overtightening.
This step ensures the drain opening is properly sealed before connecting the rest of the plumbing.
Step 3 – Assemble and Install the P-Trap
The P-trap prevents sewer gases from entering your home. It must be aligned correctly.
Connect the trap arm to the wall drain outlet. Then attach the curved trap bend to the tailpiece.
Ensure all washers are properly seated inside slip nuts. Hand-tighten slip nuts firmly, then give a small additional turn with a wrench if necessary.
Do not overtighten. Excessive force can crack plastic fittings or distort washers.
Step 4 – Connect Drain Pipe to Wall Outlet
Align the horizontal trap arm with the wall drain outlet. Ensure there is a slight downward slope toward the wall to allow proper drainage.
Avoid cross-threading fittings. Start threads slowly and gently. If resistance feels uneven, back off and realign.
Proper alignment is critical. Misalignment causes leaks and drainage issues later.
Step 5 – Connect Hot and Cold Water Supply Lines
Wrap PTFE plumber’s tape around threaded fittings before attaching supply lines.
Connect hot and cold water lines to the faucet and shut-off valves. Tighten securely but do not over-torque.
Confirm each connection is aligned properly and not twisted. Twisted supply lines can weaken over time and leak.
Step 6 – Test for Leaks and Proper Drainage
Turn the water supply back on slowly. Run both hot and cold water for several minutes.
Inspect all joints carefully. Use your fingers to feel for moisture around slip nuts and supply connections.
Fill the sink partially and release water to test drainage. Check underneath for drips.
If any leaks appear, tighten slightly or reposition washers.
Never skip this step. Leak testing protects cabinets and flooring from water damage.
Common Causes of Kitchen Sink Plumbing Leaks
Even small mistakes can lead to leaks. The most common causes include:
- Loose slip nuts
- Missing washers
- Misaligned P-trap
- Over-tightened fittings
- Incorrect drain slope
Most leaks happen at connection points. Proper alignment and correct washer placement solve most issues quickly.
When to Call a Professional Plumber
While many homeowners can complete this task, there are situations where professional help is safer.
Call a plumber if you experience:
- Persistent leaks after tightening
- Drain alignment issues that cannot be corrected
- Wall drain height mismatch
- Complex double sink or garbage disposal setup
- Low water pressure or faulty shut-off valves
If pipes are inside walls or require modification, professional expertise ensures compliance and long-term reliability.
Hiring a qualified plumber may prevent repeated DIY attempts and potential water damage.
Cost to Install Kitchen Sink Plumbing (DIY vs Hiring a Plumber)
DIY Material Cost Estimate
DIY material costs generally include:
- P-trap assembly
- Tailpiece
- Slip nuts and washers
- Supply lines
- Plumber’s tape
Typical materials may range between moderate affordable costs depending on quality and region. If you do not own tools like a wrench, additional purchase may increase expense.
DIY is cost-effective if installation goes smoothly and no corrections are required.
Professional Installation Cost Range
Professional installation pricing varies based on complexity and location.
Factors affecting labor pricing include:
- Single vs double sink
- Garbage disposal integration
- Drain relocation
- Supply line replacement
Professional service usually includes proper alignment, leak testing, and verification of code compliance.
While hiring a plumber costs more upfront, it reduces risk of water damage and repeated repairs.
Preventive Tips to Avoid Future Plumbing Issues
Proper installation is only the beginning. Long-term reliability depends on maintenance.
- Do not overtighten fittings
- Use quality washers and seals
- Check for leaks after first 24 hours
- Clean P-trap periodically
- Avoid grease buildup
Grease accumulation is one of the leading causes of clogs. Avoid pouring oil or food scraps down the drain.
Periodic inspection under the sink can prevent small drips from becoming major problems.
FAQs About Installing Kitchen Sink Plumbing
Do I need plumber’s tape for kitchen sink plumbing?
Yes, plumber’s tape helps create a secure seal on threaded water supply connections.
How tight should slip nuts be?
Tight enough to seal but not so tight that fittings crack. Hand-tighten firmly, then slightly tighten with a wrench if needed.
Can I reuse old P-trap parts?
It is possible if parts are in good condition, but replacing old washers is recommended.
Why is my sink draining slowly after installation?
Slow drainage often results from incorrect slope or partial blockage inside the trap.
How long does kitchen sink plumbing installation take?
Most standard installations take 1.5 to 3 hours for beginners.
Is installing kitchen sink plumbing a DIY job?
Yes, for simple setups. Complex systems or wall modifications require professional assistance.
What tools are absolutely necessary?
An adjustable wrench, plumber’s tape, and proper fittings are essential.
Conclusion
Installing kitchen sink plumbing becomes much more reliable when each step is handled with care and precision. Shutting off the water supply, aligning components correctly, securing fittings without overtightening, and performing a complete leak test are essential to prevent future damage. Even small installation mistakes can lead to hidden moisture issues, cabinet deterioration, and unnecessary repair costs if not corrected early.Addressing problems promptly protects your home and ensures long-term performance. While some installations may seem straightforward, complex pipe configurations or recurring leaks require professional expertise to guarantee safe and lasting results. At Bright Street Facilities Management, we deliver dependable plumbing service with precision, experience, and a focus on long-term reliability. If you want complete peace of mind and expert workmanship, contact us for professional kitchen sink plumbing installation services.